End to end configuration of sensitivity labels to protect content in Microsoft Teams, Office 365 groups, and SharePoint sites.

As of now this feature is in Public Preview!

You can create sensitivity labels in the compliance center and these labels can be applied for the following containers: Microsoft Teams sites, Office 365 groups, and SharePoint sites.  As of now we have the following label settings to help protect the content in those containers:

  • Privacy (public or private) of Office 365 group-connected teams sites
  • External users access
  • Access from unmanaged devices

When you apply this label to a supported container, the label automatically applies the configured options to the connected site or group.

Important thing to note  – The Content in those containers do not inherit the labels for settings such as the label name, visual markings, or encryption. So that users can label their documents in SharePoint sites or team sites only manually with E3 License.

To create Sensitivity label in the Compliance Center –

Protection Full

Here we created two Sensitivity labels  one for private and the other for public sites with guest sharing on, on creation of these go with the default options on all except “Site and Group Settings”

Create New Sensitivity Label

New Sensitivity Labels

Site and group settings option for company – restriction label with private

Sensitivity Label for Private

Site and group settings option for company – public label with public and guest sharing

Sensitivity Label for Public

We have to publish these labels through label policies –

Always a good practice to publish label to one or two users and test before publishing for the large groups. Also deleting or modifying the label while it’s associated with sensitivity policies can result in team creation failures across the tenant. Therefore, before you delete or modify a label, you must first disassociate the label from its associated policies.

Label Polcies Published

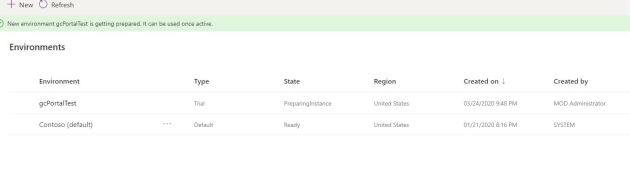
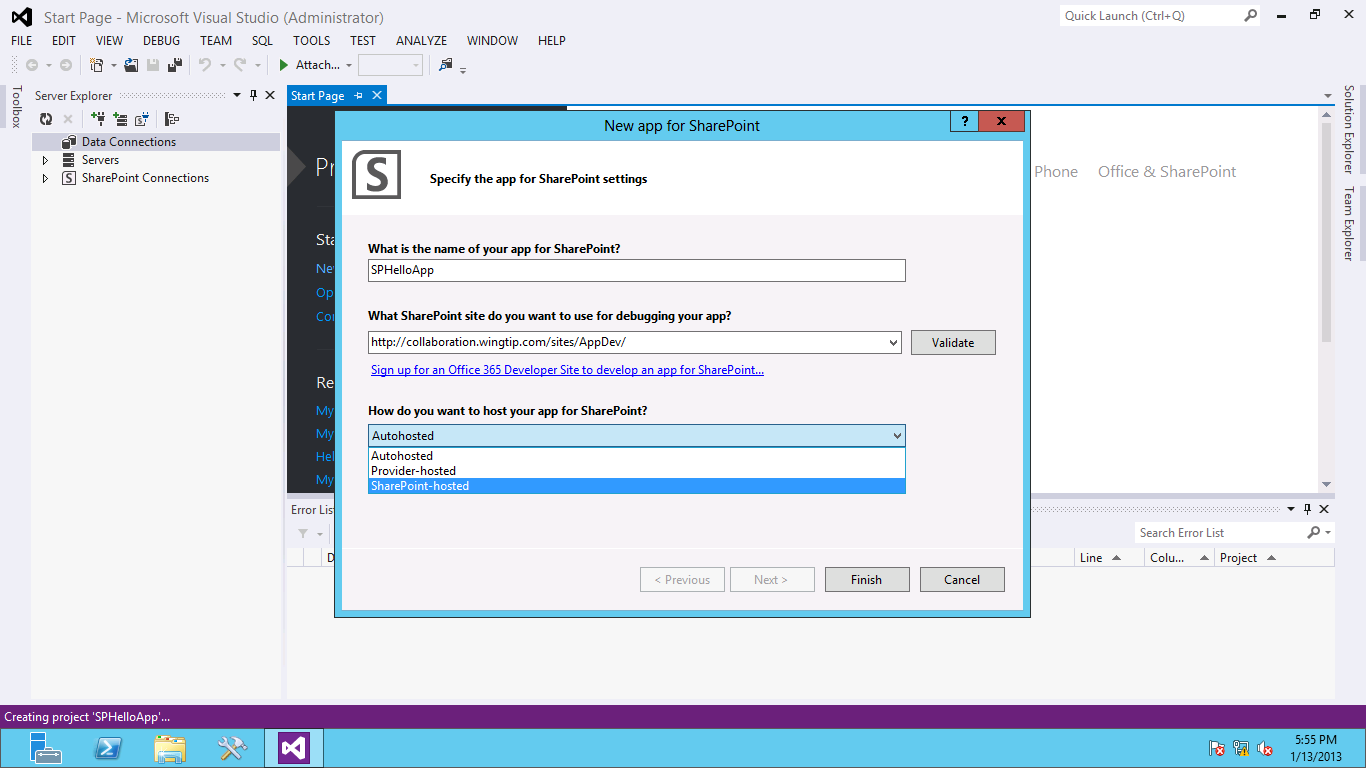
Now go to Azure (portal.azure.com)  and try creating an Office 365 group no surprise we don’t see the option to pick a sensitivity label.

Create New Office 365 Group in Azure Before

So we need to enable sensitivity labels through PowerShell (Link),  as it required enabling the feature.  If no group settings have been created for this Azure AD organization you get the below error, so you must first create the settings.

Settings Error

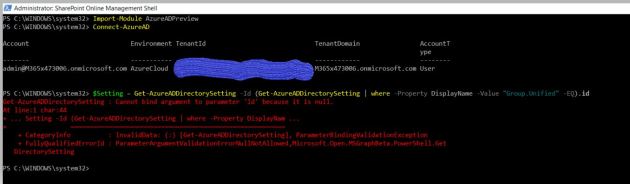
Follow the steps in Azure Active Directory cmdlets for configuring group settings to create group settings for this Azure AD organization.

Important that you uninstall any previous version of AzureADPreview and install the latest version of Azure AD Preview to have this work.

These steps create settings at directory level, which can apply to all Office 365 groups in the directory.  Again to configure Office 365 group settings for your directory, you use the template named “Group.Unified”.

So  as an example we can add usage guideline URL, for that you need to get the SettingsTemplate object that defines the usage guideline URL value; that is, the Group.Unified template.

Azure AD Directory Settings 1

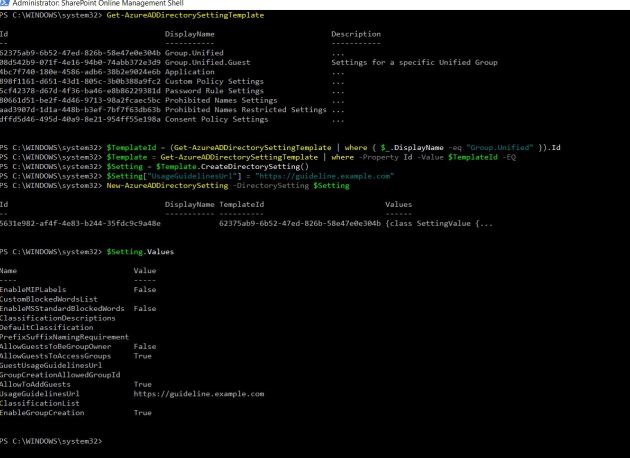
As our objective is to just create group settings for this Azure AD Organization and not to use the UsageGuideline Url, so we are going to reset it to empty. To update the empty value for UsageGuideLinesUrl in the setting template, read the current settings from Azure AD, otherwise we could end up overwriting existing settings other than the UsageGuideLinesUrl.

Azure AD Directory Settings 2

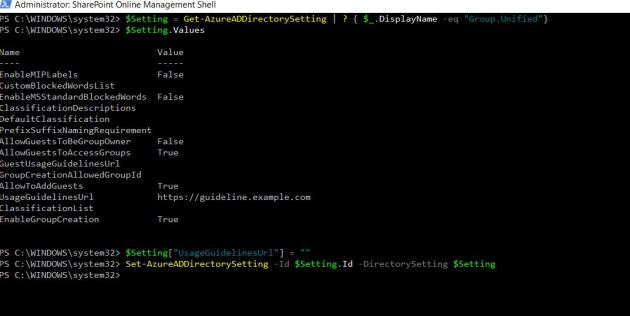
Now the group settings have been created for this Azure AD organization, we can enable the feature through “EnableMIPLabels”. In the following picture we can see that we have Enabled MIP Labels to true.

Enable MIP Labels

After enabling mip labels, if we go to Azure and try to create new Office 365 Group; now we will see a new field “Sensitivity label” under Membership type.  This is almost instantaneous but to have this to show up in SharePoint it might take around an hour or so as SPO has a caching refresh logic. Also it could take up to 24 hours for your published labels to show up in the Sensitivity label dropdown .

Create New Office 365 Group in Azure After

If you want to Apply Sensitivity Labels through SPO Admin center – Select the site and see in the site and go to Policies, there we can see the section for Sensitivity and click Edit under it.

spo admin policies

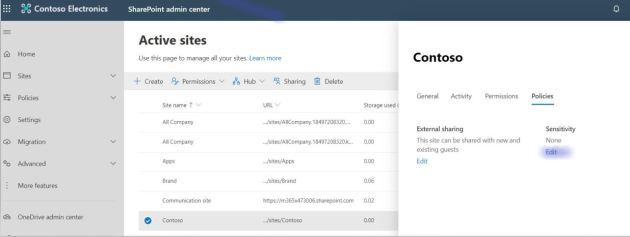
Here you can pick the Label that you want apply to the site  (These are the Sensitivity Labels created & published in the compliance center).

Apply Sensitivity Labels

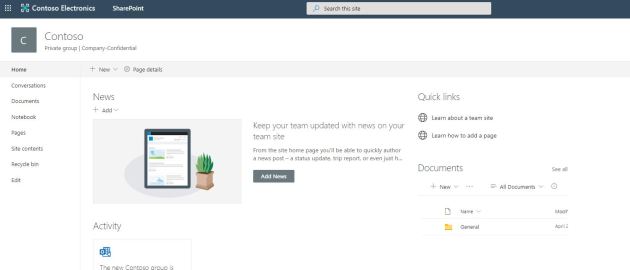
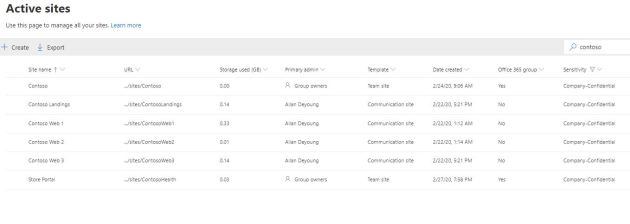
After applying the label to the site “contoso” – It changes the public group to private group and  the label name “Company Confidentail” would show up.

Public to Private Group


To change the label of the site as a Site owner go the settings – site information

Site Information

Now we have the label feature enabled and few labels published, so the creating dialog for provisioning Sites/Groups/Teams have the sensitivity option shows up. In Teams if we pick the label company confidential it will only enable the relevant options that comply with the label.

Finally now if we want to go back and apply these labels for several other existing sites, we can do through the PowerShell

PS for Apply Labels

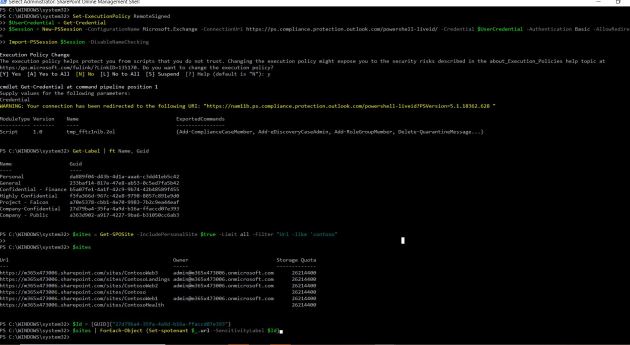
PowerShell Screen shot

If you have a requirement to set “Sensitivity” label for
many site-collections using PowerShell is the most optimized way.

Download the latest SPO admin PowerShell

//For connecting to SPO
connect-sposervice

//Office 365 Security & Compliance Center PowerShell allows you to manage your Office 365 Security & Compliance

Set-ExecutionPolicy RemoteSigned
$UserCredential = Get-Credential
$Session = New-PSSession -ConfigurationName Microsoft.Exchange -ConnectionUri https://ps.compliance.protection.outlook.com/powershell-liveid/ -Credential $UserCredential -Authentication Basic -AllowRedirection
Import-PSSession $Session -DisableNameChecking

//Get the list of Sites that you want to apply Labels
$sites = Get-SPOSite -IncludePersonalSite $true -Limit all -Filter “Url -like ‘contoso”
//That’s the guid of my company confidential label
Get-Label | ft Name, Guid
$Id = [GUID](“27d79ba4-35fa-4a9d-b16a-ffaccd07e393”)

//Apply this sensitivity labels for sites
$sites | ForEach-Object {Set-spotenant $_.url -SensitivityLabel $Id}

Applied Labels

We can extend this enabling sensitivity files for office files through the (link)

In the near future we may have few more options available for these labels, so I think it would be worth investing and adopting this in your tenant.

Note: I would really thankful for Sanjoyan Mustafi for his timely response on questions and his snippet on Powershell to apply Sensitivity labels for  many sites.

Attachments on “Power App Portals” for Anonymous Users

Power Apps makers can create external-facing websites that allow users outside their organizations to sign in with a wide variety of identities, create and view data in Common Data Service, or even browse content anonymously through “Power App Portals” .

Recently I had a question from a colleague, to enable attachments for Anonymous users through Portals , then I thought it is worth doing a blog to help anybody looking. With MS Forms we can do attachments through file upload but it doesn’t work for Anonymous users.

I am going create a trial environment for creating Power App Portal,  and an Entity in CDS to store data for the App, will go on configuration of  Form and permissions to have the  attachment to show up on Portal for the Anonymous user.

Creating a Trial Environment  (https://admin.powerplatform.microsoft.com/environments)-

Trial Environment

Then we can see all the Environments in our Tenant-

All Environments

To Create Portal App we have to switch to the Trial environment that just created, after that go to Apps and should pick the “Portal from blank” option to create new Portal App.

Portal from Blank

We can create only one Portal App for an Environment, and usually it takes few minutes to finish creating.

Create Portal  Provisioning In progress

After Provisioning you can see Portal App in this scenario “PortalAnonymousTest” .

The Portal Management app allows you perform advanced configuration actions on your portal. The app is available after the database on Common Data Service is created successfully.

Through the Portal Management we can configure our Portal App.

Click on Portal Management

Before configuring further we create a Custom Entity “gcCustom” that will be used in the Portal App to store user data.

For Attachments on Portal to work, we need to make sure check the “Enable attachments” option on the New entity screen.

Create New Entity

Entity Provisioned

Just to have some  meaningful data created few Custom Fields in  “gcCustom”

Custom Fields

To the use the Model driven form of this Entity in Portal App, either we can create new form or customize the existing form for this Entity. In this case I wanted to use the out of the box Main form.

Entity Forms

Edit the Form

Edit the form and we add custom fields to the form, just changed name of Form to “gcMain”

Edit view of the Form

It is a good idea to check the Notes Properties under “Time line” section by switching to classic view of the Form.

Classic View of Form

Select the Notes Control and Click “Change Properties” from the tool bar, just to make sure we have “Notes” selected in Additional Options.

If you created a custom form and added the notes section to it, be sure to select Notes as the default tab you want to be visible.

Changing Properties of Notes

With this now we can go back to the Portal App Configuration and Click on Portal Management for configuring Entity Form and additional options.

Portal View

When you click on the Portal Management you will be opening below-

portal Management

Go to “Entity Forms” and Create one for the Entity “gcCustom” and use the re-named form “gcMain” (On CDS – Entity). As we are allowing only Insert and upload attachment pick mode as “Insert”

Make sure  check “Enable Entity Permissions”

Explicit Entity Permissions are required for any notes to appear on the portal. For read and edit, the Read and Write privileges must be granted. For create, two permissions must exist: a permission with the Create and Append privileges must be granted for the note (annotation) entity, the second permission must be assigned to the entity type the note is being attached to with the Append To privilege granted.

Entity form In Portal

Next go to “Additional Settings” and scroll down below to “Add Attach File” section to check all the following options.

Entity Form Attachment Additonal Sections

Next create “New Entity Form Metadata”

New Entity Form Metadata

In this step create Entity Form Metadata with Type “Notes” and minimum Create Enabled “True” and in Create Dialog Options have Display Attach file (Enables a file upload field in the Add Note dialog box, allowing a user to attach a file to a note.) as “true”.

New Entity Form Dialog

Now we have Entity Form configuration ready with all options,  the Note control will be rendered by using the appropriate options enabled on the portal.

Now we need to make sure that Anonymous user role has appropriate permission.

Go to Security –  Entity Permissions on the Portal Configuration and create Entity permissions on custom Entity “gcCustom” and also Annotations (Notes) Entity that comes out of the box.

Go to Entity Permissions

gcEntity Permissions

Activity Entity Permissions

Add Existing Web Role – “Anonymous Users”to both the Entity Permissions created above.

Add roles to for Entities

Add Anonymous Permissions

This will completes the minimum required configuration on the Portal Management.

Go to back to App Section and click on Edit the Portal App

Edit the PowerApp Portal

This will open Portal App in Edit Mode and to make easy leave the home as is and create new Page to add the new form.

Portal Home Page

Created new Page to host the Model driven form

Create New Page to Add Form

Add form Control on to the newly created Page

Insert form

We can use the existing form that created from the Portal Configuration

Use existing Form

if we click the “Browse Website” this page will be redirected on Web browser – (Some times the configuration change will get updated on browsing, if you will the cache is not clearing or changes not propagating click on Sys Configuration)

Portal New Page

Portal Attachments

Click “Submit” you see the record and attachment saved successfully.

succesfuly save

Finally if you want to see if the record saved you can go the CDS – Entity (gcCustom) – Data

View in CDS Data view

The above steps will help you to create a Power App Portal for Anonymous users to upload attachments.

PS  – I would like to give credit to Yogesh Gupt for few links and tips.

Run the Item level work-flow on Multiple Items based on a Status Column

$site = Get-SPWeb “http://xyz”
$web = Get-SPWeb “http://xyz/web”

$list = “ListName”;
$list = $web.Lists[$list];

$wfToStart= “WF_Name”

#Workflow Manager
$WorkflowManager=$site.WorkFlowManager
$association=$list.WorkFlowAssociations | where {$_.Name -eq $wfToStart}
$association.AllowAsyncManualStart = $true
$association.AllowManual = $true

foreach ($item in $list.Items) {
if ($item[“Status”] -eq “Complete”) {

$data=$association.AssociationData
$wf=$WorkflowManager.StartWorkFlow($item,$association,$data)
Write-Output “$wftoStart started on ” $item.Name

Write-Output $item.Name
}
}

$web.Dispose()
$site.Dispose()

Powershell to move Columns from List to the other List in SharePoint

$web = Get-SPWeb “http://fromsite”
$Toweb = Get-SPWeb “http://tostie”

$FromList = $Web.Lists[“FromList”]
$ToList = $ToWeb.Lists[“ToList”]

foreach ($spField in $FromList.Fields)
{
if( $Tolist.Fields.ContainsField($spField) -ne $true)
{
Write-Host $spField
$ToList.Fields.Add($spField)
$ToList.Update()
}
}

$web.dispose()
$To.dispose()

How to change the default text “SharePoint” that appears on the top left of the screen:

$app = Get-SPWebApplication -Identity http://WebApp
$app.SuiteBarBrandingElementHtml = “

OurCaliber Portal


$app.Update()

You’re first On-Premise SharePoint App

To build Apps with SharePoint 2013 it is not required that you will have SharePoint  installed on the Dev. machine, SharePoint 2010 we are used to build solutions on the box that has SharePoint installed. If you have one box (Development) that runs every thing like AD DS with DNS integrated, SQL Server, Share Point 2013 and Visual Studio 2012. Before you do anything with the Apps environment has to be ready.

We have to configure the following things –

  • Wild Card DNS record for App Domain: A wild card CNAME records that point to the host domain of the SharePoint Farm.

Create Wildcard Domain for the Apps to host and this will be called as app domain. The user account that performs this procedure has to be a local administrator.

In the DNS Manager, right click on Forward Lookup Zones and the click New Zone

NewZone

In the New Zone Wizard, select the Primary Zone as Zone Type and click next. Leave the default Replication Scope and click next.

ZoneTypeScope

In the Zone Name page, type the Zone Name (in this example wingtipapps.com, you can use your app domain) and click next. On Dynamic update page leave the default and click next.

 ZoneName  DynamicUpdates

Completing the New Zone Wizard page, review and Finish

ZoneFinish

Now to create a wildcard CNAME record, go to Forward Look-up zone. Make sure the user is a local administrator.

DNS1

Click on Wingtipapps.com – By default it will create a SOA and Name Server record

DNS2

Right Click the new app domain Wingtipapps.com and click New Alias(CNAME) record, Type * in the Alias as

we are creating a Wild Card domain,  click Browse and navigate to the Forward Lookup Zone for the domain that hosts

the SharePoint sites to add the Fully Qualified Domain

 Appdomain  appdomainbrowse

Click wingtip.com (In my case that is primary domain that hosts the SharePoint sites)

Select the record with (in this example 192.168.150.1) as that was the IP of the SharePoint host Domain.

Appdomain3

You will screen looks like this and Click Ok.

appdomain4

With this we are completed on adding the DNS record

Appdomain5

Note: if your SharePoint sites are using SSL or if you use any apps that use data external to the SharePoint sites you should configure wildcard SSL Certificate

  • Service Application: The Subscription Settings and the App Management service applications are required. These services support apps in the environment by storing the required data for the apps to run.

Each App will have a unique URL, we will set the App Domain (Wild Card DNS record) and prefix to the Subscription setting service.

Ex: prefixApphash.wingtipApps.com/sites/AppDev/appname


App Management can be provisioned through Central Administration – Manage Service Application. Verify the user account that you are using is a Farm Administrator.

 AppService On the other hand Subscription Management Subscription can be   provisioned only through PowerShell$apppool = Get-SPServiceApplicationPool “Default   SharePoint Service App Pool”Note: “Default SharePoint Service App Pool” is your   SharePoint Service App Pool and already created.$sa   = New-SPSubscriptionSettingsServiceApplication -ApplicationPool $appPool   -Name “Subscription Settings” -DatabaseName   “Subscription_Settings_DB”New-SPSubscriptionSettingsServiceApplicationProxy   -ServiceApplication $saGet-SPServiceInstance |   where{$_.TypeName -eq “Microsoft SharePoint Foundation Subscription   Settings Service”} | Start-SPServiceInstance

Once After Provisioning these services make sure that you have the services related to the above Service Applications are running, If not run them. Services are “App Management Service” & “Microsoft SharePoint Foundation Subscription Setting Service”. Go to Central Admin – System Settings –  Manage Services on the Server

For the Subscription Setting service you have to set the Appdomain (wingtipapps.com) and the prefix to have the apps. We can set in two ways either through PowerShell or through Central Administration

Through Central Administration – Go to Apps and click on “Configure App URLs”. In the App domain box type the isolated that you created above for hosting apps. In App prefix type the name that you want to use for URL prefix for apps, then click Ok.

 appscreen  appurls

We can use the PowerShell:

Set-spappdomain -appdomain “wingtipapps.com”

Set-spappSiteSubscriptionName -Name “app”

  • Web Application

If you are using Web Applications with host headers and has path-named site collections you have to make sure that you create a Web Application without a host header at Port 80 and recommended to have a blank root site collection. Otherwise you will have 404 errors. This will help the apps to route to correct Web Application, as host headers won’t match the app domain.

Go to Central Administration –

ca

In this Web Application – I have created a blank Site Collection – “Home”

sitecollection

App Catalog – if you are providing apps to the site owners to install, you have to configure the App catalog for containing your apps. App catalogs are Web Application based, so you can have one or more for each Web Application. So you have to decide which Web Application needed an App catalog. Again the App Catalog is a site inside a web

appscreenfull

If you don’t have any associated App Catalog’s for the selected Web Application you will start by creating new one

appcatalog

It was like creating any other Site Collection, provide the required information

This is how your default App Catalog site looks like

appsclook

  • App Configuration

To build the App, make sure that you not logged in as Administrator. If you log-in as Administration and want to run the Apps you will get errors like following

apperror

Development Site –

In SharePoint 2013 we have a new template called Developer Site to help on deploying the apps while developing/debugging – create a Site Collection for you to debug/deploy for testing the Apps

Create an AppsDev Site Collection –

appdevsite

After the Site Collection is created this is how it will look like

appdevsitelook

Now we are ready to build our first App – Again make sure that you are not logged in as Administrator and you are a Site Collection Administration for the Developer site that you build

Run the Visual Studio 2012 editor as Administrator, go to File – New Project and select Office SharePoint – Apps and Pick “Apps for SharePoint 2013”. Type SPHelloApp and click ok, this will be the name of the App.

vs1

You will be prompted with this screen, make sure that you will update the URL of the Developer Site Collection that you created.

vs2

There are three types of Apps and they are varied based on where they hosted. Here we are going to build the “SharePoint Hosted” app. Select that one and click Finish.

Your first App is created –

vs3

As we are trying to build a simple one –

In the Solution Explorer – go to the Pages/Default.aspx

Add the Code in the PlaceHolderMain content Place holder

vs4

Go to the Scripts/App.js and write the function SPAPPHello

vs5

Run the App in Debug Mode, you will see a screen like this

vs6

If you click on “Click Me” –

vs7

SharePoint Saturday San Antonio

Connecting to the External Data with SharePoint 2010 using BCS

Thank you so much for attending the session, really enjoyed speaking here in San Antano, we have discussed the overview of BCS and dive into the topics surrounding the connectivity to external data sources using SharePoint Designer 2010. We have seen some cool demos!!

Please click here for Slides

Replicate Directory Change Permission” (without write permission) for User Profile Sync

The Synchronization Service Account that is used to connect in the User Profile Synchronization (UPS) required “Replicate Directory Change Permission”, all the Domain’s that we are synchronizing need to Delegate this Permission

for the Service Account. This permission will allow the service account to query the changes in the directory (AD DS) and with this permission nothing can be updated in the AD.

UPS Service uses the DirSync control an LDAP extension that enables to search Active Directory partition for objects that have changed, when UPS perform a DirSync search it creates a cookie that identifies the directory state at the time

Of an earlier DirSync query. With the Frist search the program creates an empty cookie and AD returns all objects that satisfy the query. AD also returns an updated cookie that can be passed to the next search to obtain  changes that are made since the first search. For every Synchronization this process repeats.

DirSync searches are performed against whole AD partition, and returns all the changes that are made to an AD object regardless of the permission that are set on the object. It will also return deleted objects.

However to run the DirSync control the service account that is running should have Replicating Directory Changes permission andagain there is no work around for avoiding this permission to have User Profile Synchronization to Sync.